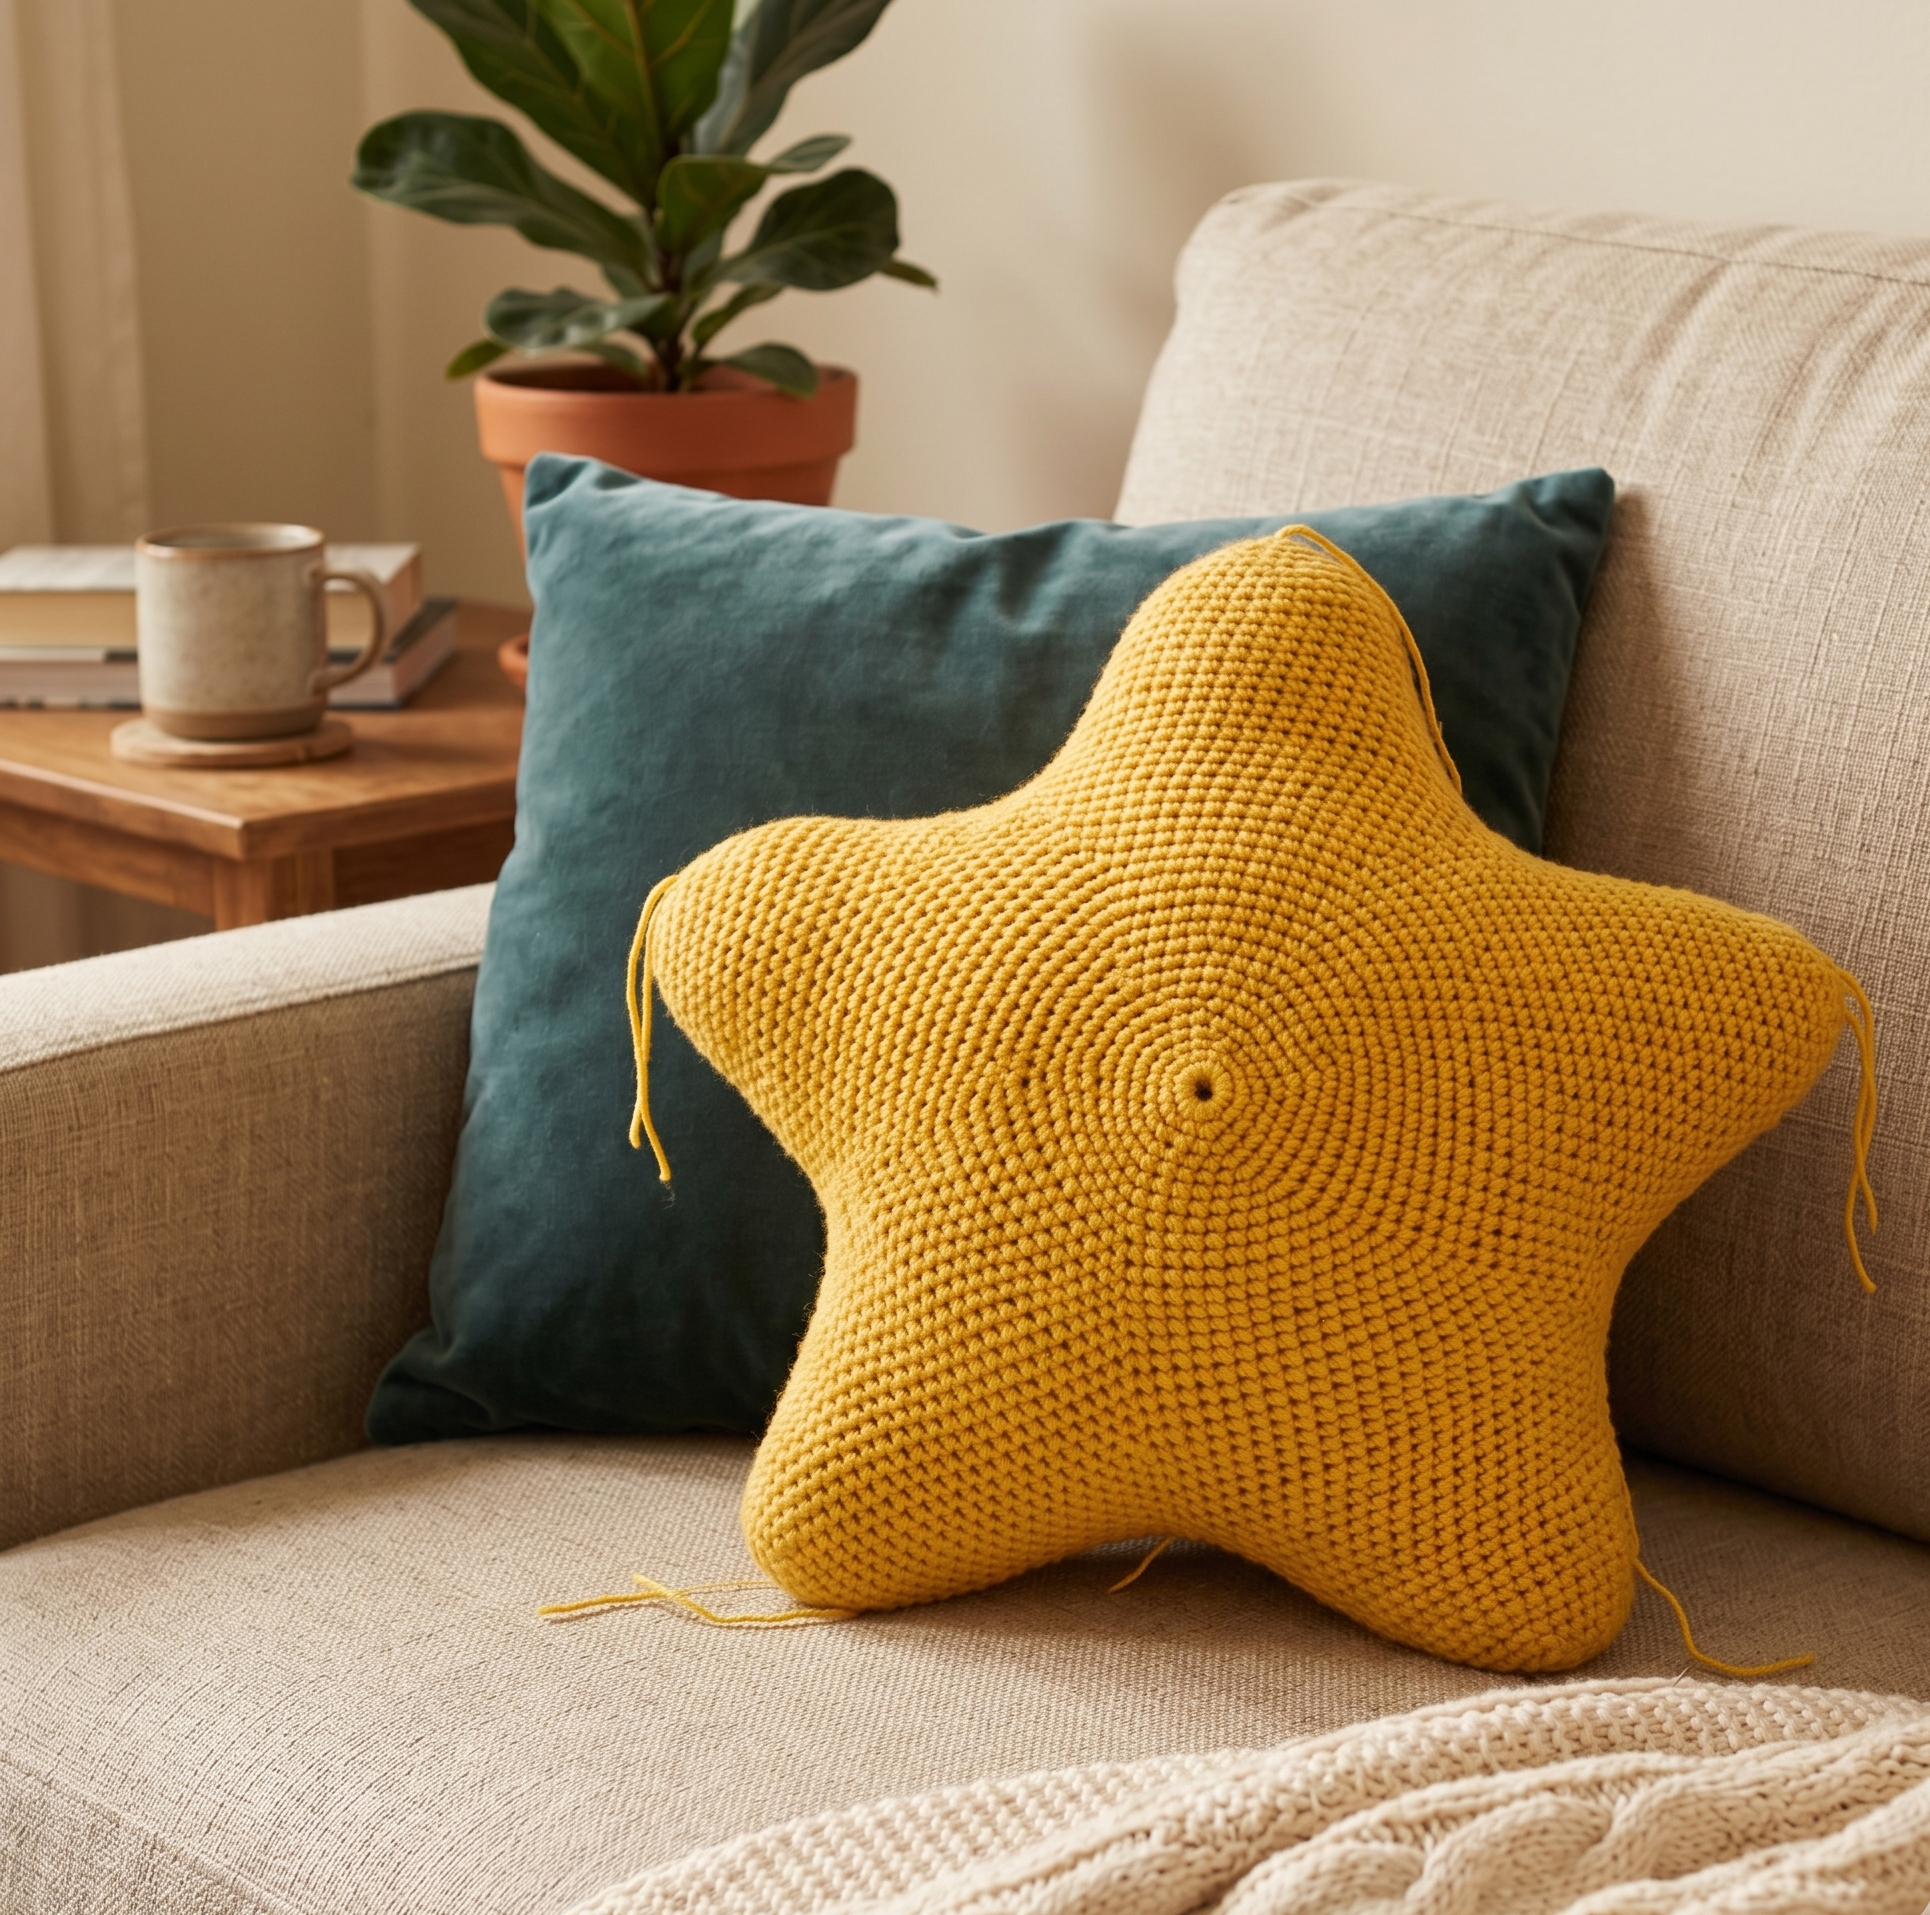
Welcome to your ultimate guide on creating the beautiful Crochet Star Pillow. Find the completely free pattern below along with expert tips, material guides, and technique breakdowns to set you up for absolute success. Ready to start your crafting journey? Grab the full printable PDF pattern from Knotsboo.com and let your creativity shine.
Table of Contents
1. The Inspiration & Why You Will Love Making This
Creating handmade home decor brings unparalleled joy and a cozy touch to any room. This guide walks you through crafting a stunning three-dimensional crochet star.
The Crochet Star Pillow captures the whimsical essence of a dreamy, cozy home. We designed this specific piece to celebrate the growing trend of playful, handmade home decor items. It beautifully blends functional cushioning with delicate handmade artistry, making it a perfect addition to a nursery, living room, or reading nook.
What makes this design truly special is its clever construction method. Rather than making two flat star panels and sewing them together, this pattern utilizes two growing center circles, and the points are worked in joined rounds from the outer edge. This ensures a seamless, puffy, and perfectly shaped star.
2. The Ultimate Material & Tool Checklist
Using the correct supplies is absolutely vital for stuffed home decor. This section breaks down exactly what you need for a beautiful, durable star.
- Primary Yarn: Art. #171 (#149 Pale Grey) – 2 balls. (Work tightly so stuffing does not show through).
- Required Hook: US size E-4 (3.5 mm) crochet hook. This ensures tight structural stitches.
- Accessories: Stitch markers (essential for tracking points) and a large-eyed blunt needle.
- Stuffing: High-quality fiberfill stuffing to give your star its puffy, 3D shape.
3. Master the Core Techniques
Before beginning the main project, familiarize yourself with these core elements:
- Gauge: 22 sc + 22 rnds = about 4 in. (10 cm). Exact gauge is not essential, but tight tension is key to hide the stuffing.
- sc2tog (Decrease): Insert hook in next st and draw up a loop, insert hook in following st and draw up a loop, yarn over and draw through all 3 loops on hook (1 st decreased).
- Structure Notes: The center of the star is made from 2 circles. Star points are worked in joined rounds from the outer edge of the circles to the point. Half of the first round stitches are worked along one circle and the other half are worked along the matching stitches of the second circle.
4. The Free Pattern: Star Pillow (US Terms)
Grab your hook and let us get started! Finished size: About 14 in. (35.5 cm) across from point to point. Skill Level: Easy.
Star Center Circles (Make 2)
Wrap yarn around index finger. Insert hook into ring on finger, yarn over and draw up a loop. Carefully slip ring from finger and work the stitches of Rnd 1 into the ring.
- Rnd 1 (RS): Ch 1, work 5 sc in ring; join with sl st in first sc – you will have 5 sc in this rnd. Gently but firmly, pull tail to tighten center of ring.
- Rnd 2: Ch 1, 2 sc in each st around; join with sl st in first sc – 10 sc.
- Rnd 3: Ch 1, *sc in next st, 2 sc in next st, place a marker in last st made; rep from * around; join with sl st in first sc – 15 sc. You will have placed 5 markers.
- Rnd 4: Ch 1, *sc in each st to next marked st, 2 sc in marked st, move marker to last st made; rep from * around; join with sl st in first sc – 20 sc.
- Rep Rnd 4 until you have a total of 25 rnds – you will have a total of 125 sts with 24 sts between marked sts.
- Fasten off. Do not remove markers.
- Place Circles with WS together (RS facing out) and stitches and markers matching. Use the markers of one Circle to pin the Circles together.
First Star Point
Place a marker in the center of the top most Circle to indicate the RS. With top circle facing you, choose any marked st and draw up a loop in the st immediately to the right of that marked st.
- Rnd 1: Ch 1; working over sts of top Circle only, beg in the same st as joining, sc2tog, sc in next 24 sts (the last st you work will be immediately before the next marked st), leave rem sts of top Circle unworked, turn so that bottom Circle is now facing you; working over matching sts of bottom Circle, sc in next 24 sts, sc2tog; leave rem sts of bottom Circle unworked; join with sl st in first sc of this rnd – 50 sc. Continue working over sts of this Star Point only.
- Rnd 2: Ch 1, sc in each st around; join with sl st in first sc.
- Rnd 3: Ch 1, *sc2tog, sc in next 21 sts, sc2tog; rep from * once; join with sl st in first sc – 46 sc.
- Rnds 4 and 5: Ch 1, sc in each st around; join with sl st in first sc.
- Rnd 6: Ch 1, *sc2tog, sc in next 19 sts, sc2tog; rep from * once; join with sl st in first sc – 42 sc.
- Rnds 7 and 8: Ch 1, sc in each st around; join with sl st in first sc.
- Rnd 9: Ch 1, *sc2tog, sc in next 17 sts, sc2tog; rep from * once; join with sl st in first sc – 38 sc.
- Rnds 10 and 11: Ch 1, sc in each st around; join with sl st in first sc.
- Rnd 12: Ch 1, *sc2tog, sc in next 15 sts, sc2tog; rep from * once; join with sl st in first sc – 34 sc.
- Rnds 13 and 14: Ch 1, sc in each st around; join with sl st in first sc.
- Rnd 15: Ch 1, *sc2tog, sc in next 13 sts, sc2tog; rep from * once; join with sl st in first sc – 30 sc.
- Rnd 16: Ch 1, sc in each st around; join with sl st in first sc.
- Rnd 17: Ch 1, (sc2tog) 15 times; join with sl st in first sc – 15 sc.
- Rnd 18: Ch 1, sc in first st, (sc2tog) 7 times; join with sl st in first sc – 8 sc.
- Rnd 19: Ch 1, (sc2tog) 4 times; join with sl st in first sc – 4 sc.
- Fasten off, leaving a long tail. Thread tail through top of sts of last rnd. Pull tail to close opening at tip of Star Point. Knot securely.
Next 4 Star Points & Finishing
- With top (marked in center) Circle facing you, draw up a loop of yarn in the same st as the last st of the previous Star Point (this is the st immediately to the right of a marked st).
- Complete this Star Point by following First Star Point instructions.
- Important: Before beginning the 5th Star Point, stuff Star and Points firmly. Then stuff 5th Star Point firmly as you work, finish stuffing the Point after completing Rnd 18.
- Finishing: Weave in all ends securely.
5. Why Upgrade to the Premium PDF Pattern?
While the free pattern gives you the core mathematical structure, there is immense value in owning the official premium documentation. Upgrading ensures a completely flawless and frustration-free crafting session.
The premium digital PDF download is the ultimate tool for executing this design perfectly. It removes all guesswork by providing highly detailed placement guides and high-resolution step-by-step photographic tutorials. Being able to zoom in on complex stitch placements guarantees success. Plus, the ad-free layout is specifically designed to be extremely printer-friendly!
6. More Home Decor Patterns You Will Love
Loved making this cozy star? Build your digital library with these beautifully designed bestsellers from our Home Decor collection!


7. Expert Troubleshooting & Maker Pro-Tips
Even experienced crocheters run into minor issues when constructing 3D amigurumi or pillows. This section addresses common pain points and provides professional studio solutions.
A frequent issue when making this star is stuffing showing through the stitches. To fix this, ensure your gauge is tight enough! If you tend to crochet loosely, drop down one hook size (e.g., to a 3.0mm or 3.25mm) so that the fiberfill is securely hidden.
Another common frustration is stuffing the points unevenly. The professional solution here is to stuff as you go. Make sure you firmly stuff the core of the star *before* you start the 5th point, and then stuff the last point gradually as you work up to round 18. Use the back of a crochet hook or a wooden dowel to push stuffing firmly into the tips!
8. Frequently Asked Questions
We have compiled the most common questions crafters ask before starting this exact home decor project. Read through these detailed answers to ensure you are fully prepared.
- Is this pattern suitable for an absolute beginner?
Yes! The foundational steps are incredibly accessible. The pattern uses standard single crochet stitches, decreases (sc2tog), and working in joined rounds. If you can count your stitches and use stitch markers, you will easily conquer this pattern. - Can I substitute the recommended yarn with a chunkier weight?
Absolutely! You can use blanket yarn or super bulky yarn to make a giant star pillow. Just make sure to use the corresponding hook size recommended on your yarn label, and keep your tension tight so the stuffing doesn’t peek out. - How do I wash and care for the finished pillow?
We highly advise hand washing or spot cleaning your crochet star to prevent the fiberfill from clumping or losing its shape. Gently press the water out with a dry towel (do not wring) and lay it completely flat to air dry. - How do I receive the full digital instructions after purchasing?
The delivery process is completely instantaneous and automatic. The moment your secure payment clears, an automated email containing your unique download link is dispatched directly to your inbox. You can also log into your personal Knotsboo account at any time to access your permanent digital library.
Please Note: This guide provides the free base pattern for this project. To get the complete, printable instructions with high-resolution photo tutorials, please purchase the premium PDF pattern. All digital pattern sales are final.